Learning Objectives
- Define integrated wildlife damage management (WDM).
- Explain the need and importance of having a variety of techniques for wildlife control.
- List the tools required for WDM.
- Describe the methods for resolving wildlife damage conflicts.
- List methods to reduce animal damage before using toxicants.
- Describe various mechanical methods to repel, exclude, or kill pest animals.
- Explain how fencing and other exclusion tactics often can prevent a vertebrate pest problem.
Terms to Know
Habitat modification Changing the habitat of an animal to limit its access to food, water, or shelter. This may cause an animal to lose interest in a particular site.
Integrated wildlife damage management The timely use of a variety of cost-effective, environmentally safe, and socially acceptable methods to reduce human-wildlife conflicts to a tolerable level.
Exclusion Techniques and products that prevent wildlife from entering an area.
Frightening device Typically, a non-chemical tool designed to cause animals to avoid areas through the use of fear.
Repellent A chemical that causes animals to avoid a given location. Repellents come in 3 main forms: oral (taste), tactile (touch), and olfactory (smell) repellents.
Toxicant A lethal substance such as the active ingredient in a pesticide.
Introduction
Wildlife damage management includes a variety of methods and tools to reduce wildlife conflicts to tolerable levels. A wide range of techniques and equipment are available because no single technique will eliminate all wildlife problems. Consider the diversity of species and problem situations and it becomes apparent that wildlife control is not a one-size-fits-all activity. Furthermore, many methods can be used in combination with others. In fact, it is advisable to use a variety of control methods whenever practical, particularly to address long-standing damage situations.
Humane and Integrated Wildlife Damage Management
Integrated wildlife damage management involves the timely use of a variety of cost-effective, environmentally safe, and socially acceptable methods to reduce human-wildlife conflicts to a tolerable level. The methods used to accomplish this will be described step-by-step in this module. To be socially acceptable, you must use methods that are “humane,” which means that you cause no unnecessary pain or stress to the animal. Through each stage of your work, whether capturing, handling, excluding, transporting, or disposing of wildlife, act respectfully.
Humane does not mean that you only use nonlethal techniques to solve a wildlife conflict. In some situations, a nonlethal technique may be considered less humane than killing the animal. Catching birds with glue boards would be an example of an inhumane, non-lethal method. In addition, some nonlethal techniques that are meant to frighten the animal, or get it to stop a certain behavior, may cause some stress or pain, but for a good reason (e.g., electric fences).
Unfortunately, circumstances may make it difficult to achieve an ideal solution. What works well in one case may be inappropriate in another. Suppose a customer wants you to remove a fox from her property, but she doesn’t want the fox to be hurt. When you arrive, you notice her hand is bandaged and she admits the animal bit her. She says she didn’t do anything to provoke the fox, it just attacked. Foxes can infect people with rabies, a deadly disease. Although you can’t be sure, the animal may have attacked without reason, which is one of the warning signs of rabies.
As required by some state laws, you then call the local health department to report the possible exposure. They tell you to kill the fox so it can be tested for rabies. Your customer is not happy but she understands. She asks that you use the most humane method to kill the fox.
Of the methods available to NWCOs, two of the humane choices for killing foxes are shooting the animal or capturing it and killing it with carbon dioxide in a chamber.
You rule out shooting because you know it is illegal in this town due to local ordinances. A cage trap would offer you the most protection while handling the fox, but it’s hard to catch an adult fox in a cage trap. You don’t want to risk a “miss” that might make this animal trap-shy because you really need to capture it — and fast. You decide to set a foothold trap. Once the animal is caught, you quickly stun it and use a catchpole to place the animal in the carbon dioxide chamber.
This example illustrates a few of the factors that you must weigh in your decisions. In this case, your customer asked you to provide the most humane death possible, but legal restrictions and concerns about human safety also influenced the choice of methods for capture, handling, and killing.
Consider these 6 questions when choosing capture, handling, transportation, and disposal methods for wildlife:
- Is it legal?
- Is it safe?
- Is it humane?
- Is it practical?
- What are the environmental impacts?
- How would your actions play on the evening news?
Your understanding of these issues will deepen over time, as you gain experience working with the public and wildlife.
Now you’re ready to select a management strategy.
What are your options when confronted with a wildlife damage situation?
- Do nothing; let the problem resolve itself.
- Make the environment less attractive.
- Keep the animal out (exclusion).
- Scare the animal away.
- Remove the culprit.
- Reduce the local breeding population.
Regardless of which strategy you favor, keep the following points in mind. First, a combination of techniques almost always works better than relying on one method. Be as selective and discreet as possible. Proper timing will increase your success rate; you wouldn’t try to trap a nocturnal animal during the day, would you? Take advantage of behaviors that are a weakness for the species. Finally, watch out for risky conditions.
Avoid Creating Wildlife Orphans
Before you repel, remove, exclude, or kill an animal, take steps to prevent the orphaning of young wildlife. A lot of NWCO work happens when wildlife are raising their young, so this is an important consideration.
Many people assume that den and nesting sites are plentiful and that a female usually has several from which to choose. Perhaps this is true for some species, in some areas. It certainly is not true in all places. How often does the female find a suitable den site in time? How easily does the family recover from the stress of the experience? Do a reasonable number of the young survive to adulthood? We don’t always have the answers for these questions.
The best way to prevent orphaning is to convince your customers to wait until the young are mobile before removing, repelling, or excluding the family from the site. If that’s not acceptable, you can try to capture and remove the female and all of her young and hope that she will retrieve them and continue to care for them.
When is this most likely to work? Let’s apply a little biological common sense. Older, more experienced females probably are better at finding resources than younger females. As the young age, the mother/young bond strengthens, so she’ll be less likely to abandon them. You can’t change the ages of the animals you’re dealing with, but you might wait a little longer if you think your chances of success are poor.
Some NWCOs are refining removal techniques to increase the chances that the female will retrieve her young. Consider the following:
Time your activities to match the normal habits of that species. The sooner the female finds the young, the better. If they’re left alone too long, they may die of exposure. For a nocturnal species, start at dusk.
Remove the female, preferably using a direct-capture technique, such as a catch pole. Place the female and young in a release box (opinions differ on cardboard, wood, and plastic) in a secure location on the same property; it may be illegal to translocate wildlife to a different area. Make sure you’ve excluded the animals from the structure they were removed from by repairing or installing barriers to access locations.
Match the size of the box and its entrance hole to the size of the species. Use a smaller box with a smaller hole for squirrels and a larger box with at least a 7-inch hole for raccoons.
Cover the hole to ensure the female and her young cannot get out of the box immediately. Move the box to a quiet place outdoors. Unless they’re likely to be disturbed, keep the box at ground level. Remove the cover so the female can get out of the box. Another option is to build a box with a sliding door. Leave the door open about an inch, to keep the heat inside but make it easy for the female to slide it fully open so she can retrieve her young.
Some NWCOs prefer to use heated release boxes when it’s cold outside. Make sure that the box doesn’t get too hot. You may want to provide heat in just one area. Assume that if you put something in the box, the animals will chew on it. If you choose to use a household heating pad, make sure the animals can’t reach the wires. You can build the box with a double floor and place the heating pad in the space between the floors. Other options for heat sources include microwaveable heating pads and warm soapstones.
If you can’t catch the female, put the young in the release box and place it as close to the entry site as possible.
Learn the typical birthing and rearing seasons of the species you handle. Know how to tell when a female is nursing and what sounds the young make.
Common Wildlife Damage Management Techniques
This section is an overview of the common damage management methods available to wildlife control technicians. The goal is not to control the wildlife but to prevent damage and utilize control methods to insure that no damage occurs in the future.
Most methods for WDM fall into the broad categories listed below.
- Habitat Modification
- Exclusion
- Frightening Devices
- Repellents
- Toxicants
- Shooting
- Trapping
- Other Methods
Habitat Modification
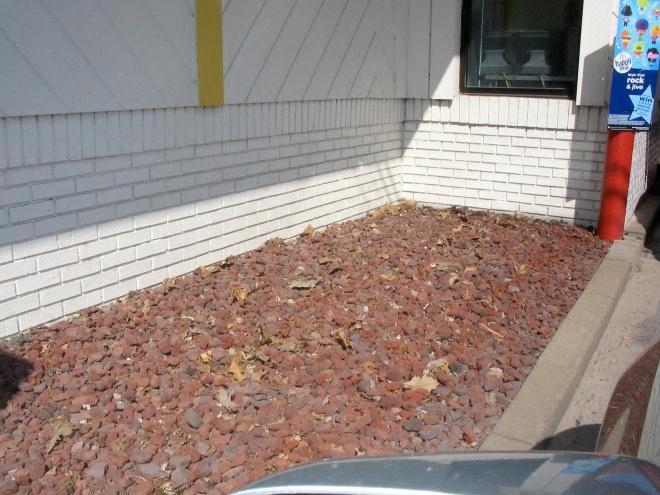
All animals need water, food, and shelter. Reducing or eliminating any of these elements can reduce the carrying capacity of the environment (Figure 1). Habitat modification can address all 3 of these life requirements. Even small modifications can enhance the effectiveness of other techniques. Using a good squirrel-resistant bird feeder and picking up spilled seed, as well as trimming branches near the bird feeder, will help to control squirrel problems.
Most habitat modifications are subtle, but they play an important role in long-term management of wildlife damage. Changes to habitat to reduce the carrying capacity for one species, however, may encourage population growth in another species. For example, mowing tall grass to reduce the presence of voles may encourage Canada geese to feed in an area.
Typical habitat modifications include:
- removing attractants (e.g., bird feeders, unsecure trash cans, outdoor pet food);
- removing brush, woodpiles, and debris;
- cutting back bushes and trees to reduce cover and access to structures;
- covering openings in buildings; and
- using wildlife-resistant plants.
Habitat modification can provide long-term solutions to difficult human-wildlife conflicts. Unfortunately, some habitat modifications can be expensive, so expect some client resistance. When the long-term effects are considered, however, habitat modification may prove to be cost-effective.
Exclusion
Exclusion includes the use of barriers to prevent wildlife from accessing areas and causing damage. Exclusion can provide immediate, long-term, and high levels of protection. Exclusion sometimes can be a cheap and easy solution. It also can be very costly, even prohibitive when large areas need protection. Become familiar with exclusion, as many of these techniques will provide clients with cost-effective ways to prevent conflicts with wildlife permanently. Some experts consider exclusion to be a part of habitat modification, but we treat it separately because so many specific tools and techniques for exclusion are available. Module 6 deals with the topic of exclusion.
Examples of Exclusion
Nets can exclude birds from important crops and buildings and have become a more reasonable solution to complex bird problems.
Screens and barricades exclude wildlife from entering crawl spaces and buildings.
Fences prevent ground-dwelling animals from gaining access to landscapes like fields, gardens, airports, and structures such as decks, porches, and buildings.
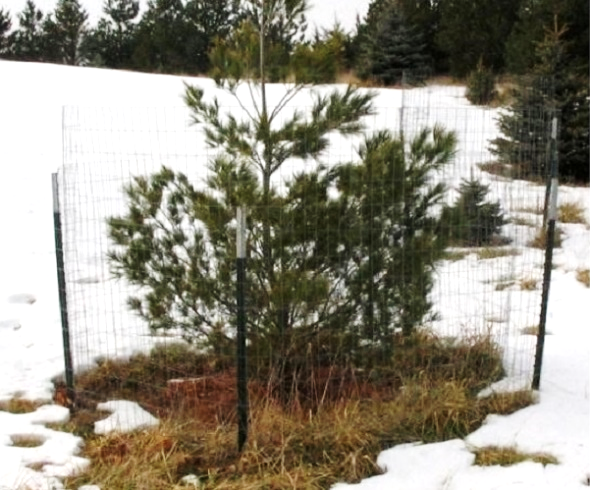
Fences are either electric or non-electric. Electric fences are both physical and psychological barriers to wildlife. They affect the movement of animals through a painful but harmless shock. Non-electric fences are physical barriers that block the movement of wildlife (Figure 2). While requiring lower maintenance than electric fences, they often cost significantly more to install.
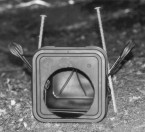
Covers, caps, and screens prevent wildlife from entering specific structures such as chimneys (Figure 3), attics, vents, doors, windows, and window wells, all of which can provide wildlife easy access into structures. Use professionally manufactured chimney caps.
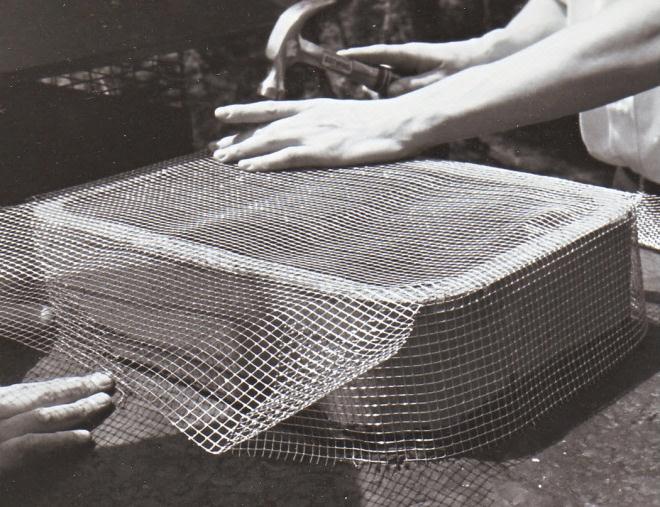
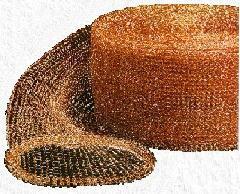
Crevice sealers include materials such as caulk, foam, mortar, and fabric (Figure 4) to fill cracks, crevices, and openings to prevent animals from entering structures.
Cone guards keep pests away from birdfeeders and nest boxes on poles. These barriers are round, flat sheets of metal with a hole in the center. To install a cone guard, place the metal sheet on top of the pole. The pole should go through the center hole in the metal sheet. Position the metal sheet between the ground and the birdfeeder or nest box. When pests try to climb the pole, the metal sheet will usually prevent them from reaching the feeder or the nest box.
Rollers are long, cylindrical wheels with supports on each end. They are mounted on peaks of roofs, signs, ledges, and other narrow locations where birds loaf. Birds land on the rollers. When the wheels roll, the birds fall off. This drives some birds away from the site.
Other methods include lines, wires, flappers, slants, spikes, coils, and shock tape. Each method has been developed for use in specific situations such as over water, in wastewater treatment systems, or on ledges. See Module 6, Exclusion, for more information.
Frightening Devices
Frightening devices scare wildlife from a location through non-chemical means. Frightening devices fall into four categories: visual, audio, audio-visual, and biological. Wildlife often quickly get used to (habituate to) frightening devices, except perhaps, those that are biological.
The act of hazing is a technique in which dogs, hawks, falcons, or radio-controlled aircraft or boats drive problem animals from a site. Canada geese can be hazed with border collies to remove the birds from golf courses, public parks, and similar locations. Occasionally, hawks are used to chase other birds from airport runways.
Birds cannot be hazed in their nesting areas during the nesting season because of the Migratory Bird Treaty Act. Be cautious hazing waterfowl during their molt (usually June 15 to July 15), because they are vulnerable and cannot fly. Secure a permit that allows the taking of geese before beginning hazing activities. Even a well-trained dog might accidentally injure a goose while chasing it, which without a permit, would be a violation of the Migratory Bird Treaty Act.
Visual Frightening Devices
Visual devices use sight to frighten wildlife.
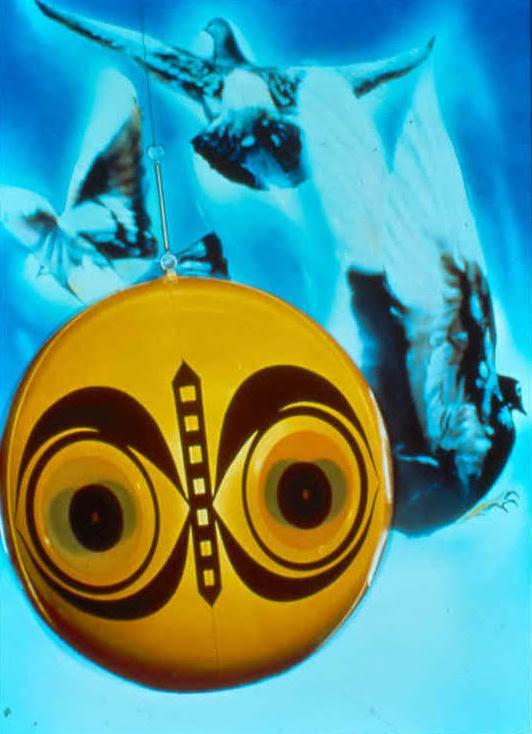
Visual frightening devices include scarecrows, effigies (e.g., plastic owls), scary-eye balloons, and Mylar® tape. Visual devices vary dramatically in price, sophistication, and effectiveness. For example, some scarecrows actually move. These animated human effigies tend to work much better than the home-made kinds, which are better considered as garden decorations.
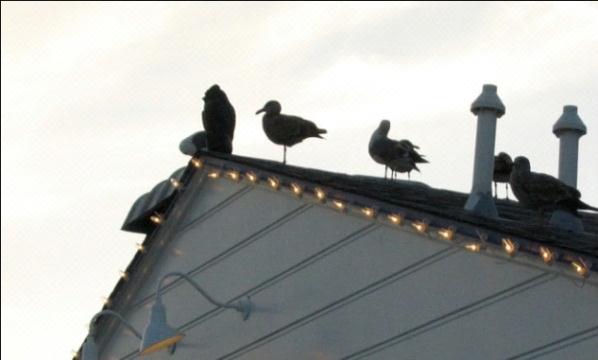
Stationary visual frightening devices are the least effective, as birds tend to habituate to them in a few days (Figure 5).
Whenever possible, choose a frightening device that moves (e.g., sways in the wind, Figure 6).
Strobe lights are marketed to frighten wildlife such as squirrels and raccoons. Manufacturers claim the lights interfere with circadian rhythms, but this claim is untested. Geese and crows can be dispersed from a night-time roost by pointing a spotlight, laser pointer, or high intensity laser light at them.
Audio Frightening Devices
Audio devices use sound to frighten wildlife.
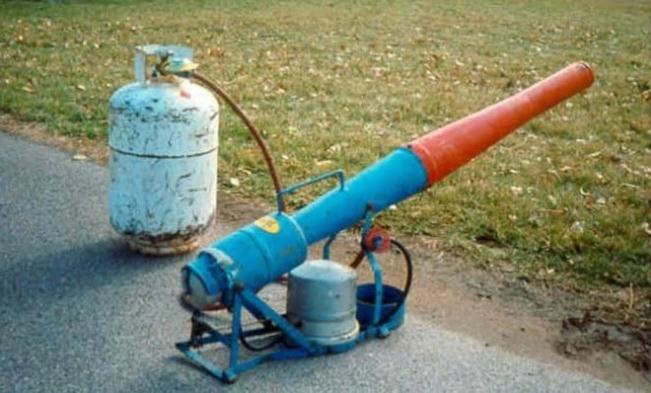
Audio devices include propane cannons and distress calls. No evidence is available that supports claims that ultrasonic devices are effective in repelling wildlife. Propane cannons (Figure 7) emit a large boom that is suitable only for rural settings. Distress calls have more versatility and can target specific species, such as crows. Volume can be a concern for neighbors. Check local ordinances and consider the effects on neighbors before using any noisemakers.
Audio-visual Frightening Devices
Audio-visual devices use sight and sound to frighten wildlife.
Fireworks-based noisemakers (a.k.a. pyrotechnic devices) include the items on the following list. Each must be fired by a person at the site.
Bangers (or bird bombs) emit a loud bang. They are launched from a hand-held pistol launcher. Bangers can be used at medium range (100 to 150 feet).
Screamers emit a long, drawn out whistle. They can be launched from a hand-held pistol launcher. The shell flies out about 100 feet, screaming and whistling all the way.
Shell-crackers (or crackers) make a loud bang that sounds like an M-80 firecracker. The shells are fired from a 12-gauge shotgun and explode 75 to 100 yards away.
Propane cannons with spinners are audio-visual frightening devices. Unlike the bangers, screamers, and shell crackers, propane cannons can be used with timers so a person need not be present.
In 2011, the US Bureau of Alcohol, Tobacco, and Firearms increased the restrictions on the purchase of these devices. In addition, these devices usually require permits in urban and suburban areas. They may pose fire hazards and risks of bodily injury.
Biological Frightening Devices
Guard animals such as dogs and llamas sometimes are used to protect livestock, especially sheep, from predators.
The livestock and the guard animal must be kept within a fenced area. Dogs can protect orchards, Christmas tree plantations, or vineyards from deer or turkey damage. Dogs within an invisible-fence system may reduce deer damage to home garden and landscape plantings.
Repellents
A repellent is a chemical that deters an animal pest from a specific location or from damaging activity. In most states, repellents are considered pesticides when used in commercial applications and must be applied by a certified applicator. More detailed information on repellents can be found in Module 7, Chemical Control.
When used properly, chemical repellents are not toxic to target animals. The effectiveness of repellents often is highly variable, depending on the motivation of problem animals, alternative resources, previous experience, and active ingredients of the repellent. Repellents work best if alternative food and shelter are available to the pest and pest populations are low.
Toxicants
Toxicants are chemical compounds used to kill problem animals.
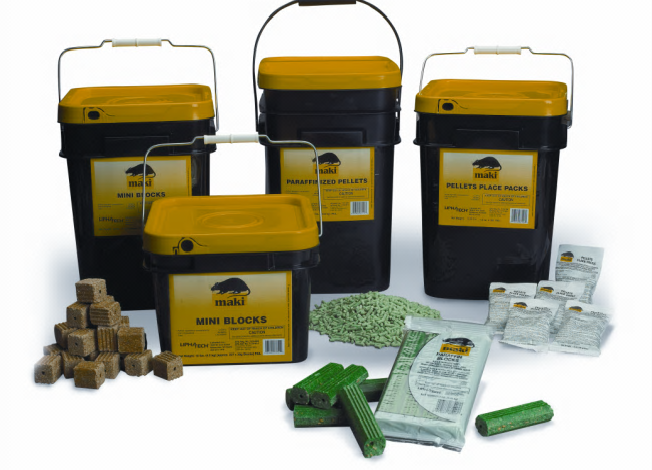
For a NWCO, toxicants are pesticides used to kill mammal and bird pests. These chemicals include rodenticides (Figure 8, to control rodents), avicides (to control birds), and frightening agents. Toxicants also include toxic baits often used to control pests such as pigeons, starlings, house sparrows, house mice, and Norway rats.
Toxicants should be used with other control methods, such as habitat modification and exclusion, to increase their effectiveness. Considerable care must be used to minimize risks to non-target animals, including wildlife, livestock, pets, and people. Always read the labels for the details and restrictions on use of all toxicants. In addition, NWCOs who use toxicants must be licensed pesticide applicators, trained and certified to use pesticides. The US Environmental Protection Agency (EPA) registers the pesticide and gives states the authority to certify or license applicators. Due to the technical and potentially hazardous aspects of applying toxicants, we included Module 7, Chemical Control in this manual to provide more specific information on toxicants.
Shooting
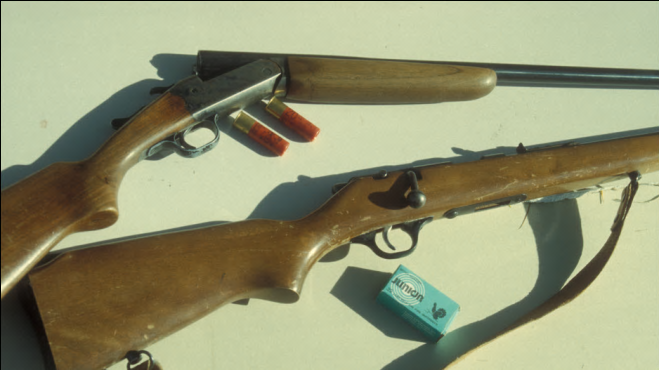
Firearms include pistols, shotguns, rifles (Figure 9), and air rifles (high-end pellet guns).
Shooting is appropriate for use with medium to large mammals (squirrel-sized and larger) and birds. Shooting requires training and skill. Safety concerns and legal restrictions must be considered before shooting. For proper training in the use of firearms, attend a hunter education course or a training course sponsored by the National Rifle Association (NRA).
Trapping
Traps are devices that can capture wildlife without the NWCO being present.
They are the tools most often used by NWCOs to remove wildlife. The information on trapping that is provided in this section is especially pertinent to NWCOs for managing problem wildlife. Because trapping is such an important part of WDM, Module 8 in this manual provides more in-depth information. NWCOs also must familiarize themselves with the NY trapping laws and regulations. They can be found on the DEC web site at www.dec.ny.gov
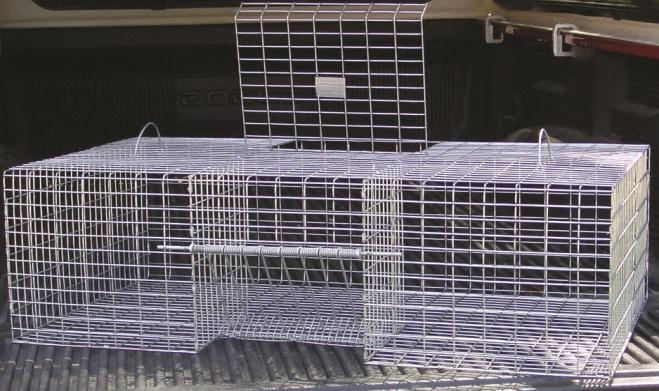
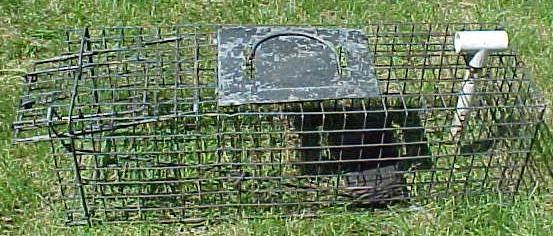
A live trap is meant to capture an animal without killing it. Live traps include cage traps (Figure 10a), box traps (Figure 10b), multiple-capture traps, foothold traps, nets, and for those NWCOs with a special permit from the DEC, cable-restraints.
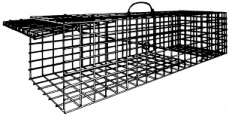
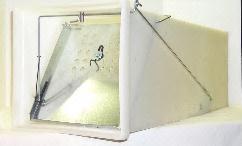
Photo by Wildlife Control Supplies, LLC.
Live-trapping has many advantages. For example, you can see what you have caught and demonstrate success to the client. It prevents animals from dying in inaccessible locations, which is a hazard of using toxicants. With live-trapping, you avoid the foul odor caused by decay that could attract other pests and is a nuisance itself. In most cases, if you are using a live trap you can release animals that are caught accidentally.
Live-trapping has disadvantages, as well. It usually is labor-intensive and you may capture the wrong animal. If a live trap is used improperly, an animal may die in it from lack of food or water; capture stress; from weather extremes ranging from heat in summer to cold in winter; or from attacks by wildlife, pets, or people.
Cage and Box Traps
Cage and box traps are the main stock-in-trade of most NWCOs. Cage traps often are made of wire while box traps often are made of solid material. The traps are available in many sizes and styles and may open on one or both ends. For example, squirrel-sized cage traps can fit into woodstoves and chimney pipes. Customers may call cage traps Havaharts® after a popular model, but many designs and manufacturers exist, including Tomahawk® and Safeguard®.
Cage and box traps are easy to set and double as animal carriers. An animal enters a cage or box trap and steps on a treadle, which causes the door(s) at the end(s) of the trap to close. Typically, little site preparation is needed. They generally are safe for children and pets. Most people think they are humane, but some animals may hurt themselves because of the stress of being restrained or while trying to escape. Most cage traps are bulky and are difficult to conceal because of their size and shape, making them vulnerable to theft and vandalism. They are expensive and require frequent cleaning.
Cage and box traps are not universally effective in capturing animals. Some species, such as coyotes, may avoid them. Even individuals of species that generally are easy to catch in cage or box traps, such as raccoons and gray squirrels, can be trap-shy, especially if they have been captured previously.
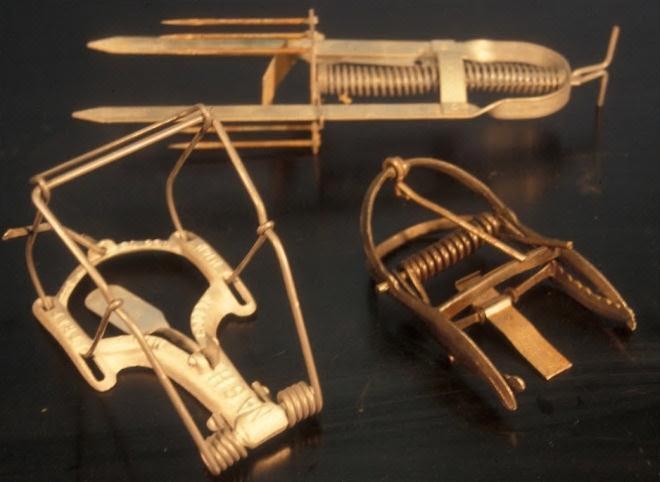
Foothold Traps
Foothold traps (Figure 11) are live traps and, as the name suggests, are designed to capture an animal by the foot.
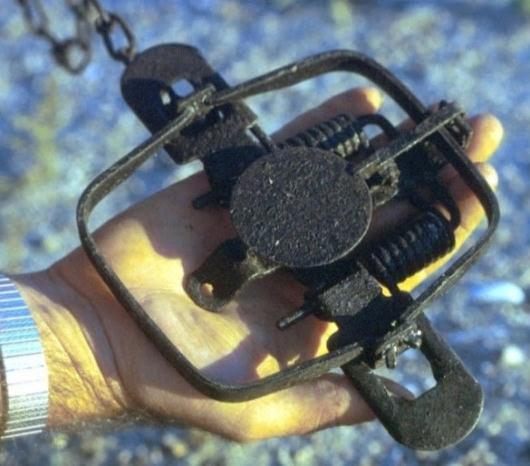
Photo by Dallas Virchow.
Leg-hold, while a common term, actually is inaccurate, as animals should not be captured by the leg due to the risk of breaking bones. Footholds can be used in land sets, water sets, and under ice. They are the most efficient tools for catching coyotes and foxes and often are important for trapping raccoons, beavers, and muskrats.
In New York, it is unlawful to use foothold traps on land with an inside jaw spread that exceeds
5 ¾”. The inside jaw spread refers to the distance between the 2 jaws measured perpendicular to the hinges when the trap is set, not counting the thickness of each jaw.
During open beaver and otter season, foothold traps up to 7 ¼” are allowed if set under water. It is illegal to set foothold traps near an animal carcass or animal parts unless the carcass or parts are covered and not visible from above.
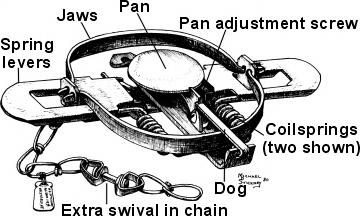
Several designs of foothold traps are available, including the coil-spring trap, which probably is the most common (Figure 12). When an animal steps on the pan, it dislodges the dog (trigger hook) from its notch, which springs the trap, and the jaws close around the foot of the animal.
In many cases, standard coil-spring traps can be modified by padding or laminating the jaws to reduce the chance of injuring the captured animal and possibly increase the effectiveness of the trap. Commercial models are available with these modifications.
Foothold traps should have multiple swivel points between the trap and the stake that anchors the trap to the ground. Swivels allow the captured animal to move around without binding the chain and twisting the leg. Most swivels within the chain are double, but single swivels usually are used at the end of the chain.
Many NWCOs modify their traps so the chain is attached to the center rather than the end of the trap. When used with the swivels, this can help align the trap at a better angle to prevent injury. Some trap manufacturers set their traps up in this manner, but most trapping suppliers sell hardware for the modification. Another modification is to have a shock-absorbing spring in the chain. Set the trap in an area that is free of anything that may entangle the chain.
Adjust the pan tension on coil-spring traps to reduce the chance of capturing the wrong species. An animal that weighs less than the target species should be able to step on the pan without triggering the trap. Adjust the pan tension by tightening or loosening the pan tension (adjustment) screw, which controls the amount of pressure needed to spring the trap. The tighter the screw, the heavier the animal must be to spring the trap. All of the tactics and modifications are used together or in various combinations to increase efficiency and reduce injury to a trapped animal. While the overall goal is to reduce injury to animals, the opinions and sensitivities of clients and the public also must be considered.
Enclosed Foothold Traps
Enclosed foothold traps (sometimes called species-specific traps) rely on the animal pulling rather than pressing on the pan or trigger. An enclosed foothold trap has the trigger in a tube, which reduces the capture of non-targets. Several traps are available including Lil Grizz® (Figure 13), Egg trap®, Coon Cuffs®, and Duffer’s Raccoon Trap®.
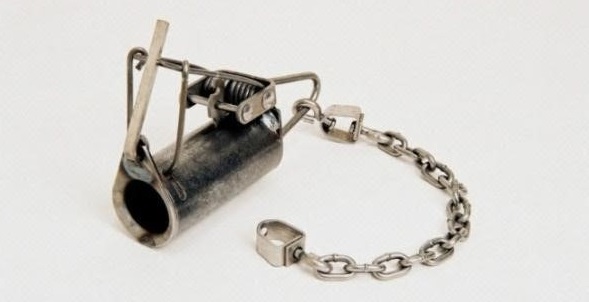
Photo courtesy of Wildlife Control Supplies, LLC.
Cable restraint Traps
Special training and permits are needed for the use of cable restraints by NWCOs. Currently, the only legal use of cable restraints in NY is for beaver control. Check with the DEC for specific requirements.
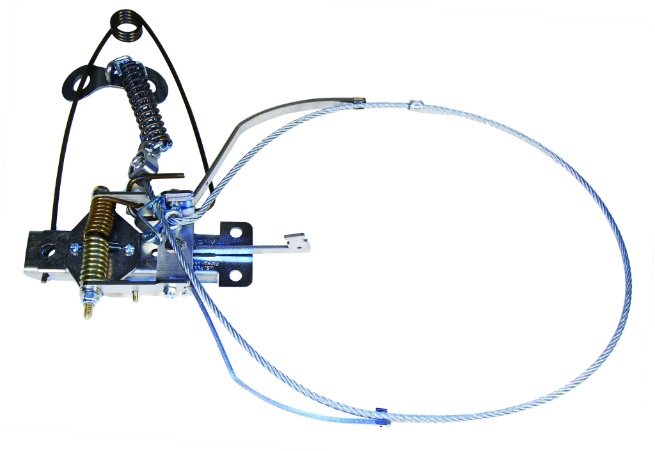
Cable-restraints, often mistakenly called snares, use a wire to capture an animal around the neck or body, and hold it without killing it. Sometimes the difference between a cable-restraint and a lethal snare lies only in the way the device is set.
Cable-restraints are either passive (gravity-operated) or active (spring-operated). Brands of cable-restraints include Belisle Footsnare® and Collarum® (Figure 14)
Body-gripping Traps
In New York, body-gripping traps are highly regulated by the DEC. Body-gripping traps used on land should not be set within 100 feet of a public trail. Read Module 8, “Trapping” for more detailed information on laws and regulations governing the use of body-gripping traps.
Body-gripping traps (Figure 15) are spring-operated, lethal traps. They should be used only in areas where non-target captures are unlikely, especially domestic dogs and cats
Several sizes are available. They usually are square, but some specialized models are round. Body-gripping traps often are called Conibears®, which is the name of a popular model manufactured by Oneida-Victor, Inc. Several designs are available, including some with one-way triggers that are more selective and some designed specifically for squirrels.
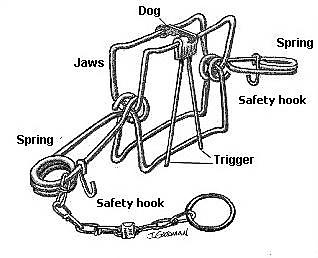
When setting a Conibear-style trap, use the safety hooks and a safety clip when positioning the trap. Be sure to release the hooks and remove the clip before leaving the set.
“Magnum” or “zero tolerance” body-gripping traps are available. They are stronger and the jaws close very tightly, so they often kill faster and more consistently than standard traps.
They may increase the chance of a proper strike with squirrels, raccoons, or other small or flexible animals that might pull back if there is a slight gap between the jaws. Magnum versions are very strong, so consider using setting tools and safety devices and be very careful when setting this kind of trap.
To set a body-gripping trap, compress the spring until the tips nearly meet at the rotating point of the jaws. Hold both jaws open and fit the dog (a.k.a. the trigger hook), which is notched, into the notch located on the trigger. When securely in place, the dog holds the jaws open. In its correct position, the jaws of the trap close on the top and bottom of the neck or chest of the animal. Traps positioned to strike the animal on the side of the body do not provide adequate time to death in a non-submerged situation.
Stabilize the trap to keep it in this top-to-bottom striking position and to ensure that it cannot be knocked over easily. Anchor the trap. The traps are light enough to be carried off by predators that are attracted by the captured animal. Some models of body-gripping traps have safety hooks that hold the springs to prevent the trap from closing. If you use safety hooks, remember to release them after the traps are set.
When an animal passes through the jaws of a trap, it moves the trigger, which dislodges the dog from its notch and springs the trap, closing the jaws around the neck or chest of the animal. Ideally, the trap catches the animal directly behind the head, snapping the spine in the upper 1/3 of the neck (cervical vertebrae). A proper hit provides a quick death.
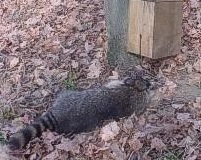
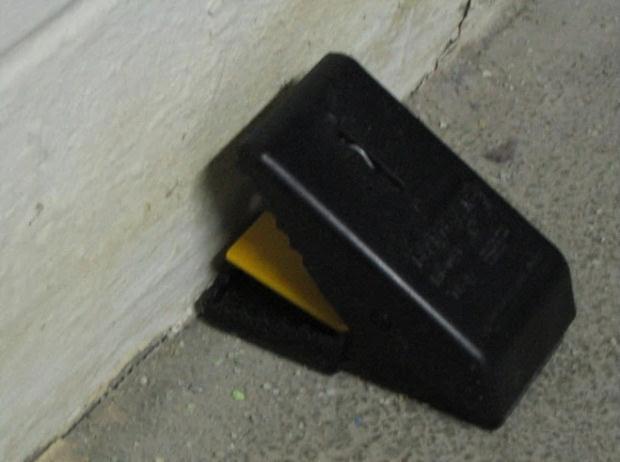
If you are trapping raccoons, skunks, squirrels, or woodchucks, modify the trigger to help ensure a top-to-bottom strike, which is more humane. These species do not tolerate anything brushing against their eyes or whiskers, so separate the trigger and center it on the bottom of the trap to prevent the animal from refusing to enter the trap. As with all lethal techniques, you should ensure that only the intended target animals are caught. Body-gripping traps often are set in front of an animal’s entrance hole because the animal must pass through the jaws of the trap to be captured (Figure 16), ensuring only an animal using the hole will be caught.
Use hardware cloth to reduce the size of the entry hole or to block escape routes. Body-gripping traps often provide the quickest way to remove a raccoon or squirrel from an attic, but this trap is not appropriate for all settings. Use extra caution if you are setting a body-gripping trap on the ground because of the risk to pets and other wildlife. Modify your technique and equipment to minimize these risks.
One way to lower the risk of catching a non-target animal is to use a vertical cubby set. The cubby set is a baited box that is open on one end with the trap set well inside, usually held in place by friction between the springs and a notch in the box. Use a trap model with two springs because those with a single spring do not stay in place. Anchor the trap so it will remain in the cubby after it is sprung. Place bait on a shelf near the top of the box. In set position, the trigger and jaws are within the box and the springs stick out to the sides of the box (Figures 17a and 17 b).

The deep-notch box (Figure 18) is an alternative to the vertical cubby set. Center the trigger on the top of the trap. Place bait deep inside the box, at least 6 inches behind the set trap. By restricting the size of the opening, you reduce the risk that a dog will spring the trap. The opening height of a deep-notch box should be no more than 6 inches off the ground.
Although the vertical cubby set and the deep-notch box work on the same idea, and are interchangeable, they have different strengths. The vertical cubby is less likely to attract cats, unless the wrong bait is used, and is more dog-proof than the deep-notch box. Sometimes a raccoon will avoid a vertical cubby but investigate a deep-notch box. With a two-way trigger, a trap can spring regardless of which way the animal approaches. It can catch an animal on its way out of its den, which is what you want, but it might also accidentally capture an animal that stopped to investigate. In some cases, that might be a non-target animal. Commercial traps with one-way triggers are available.
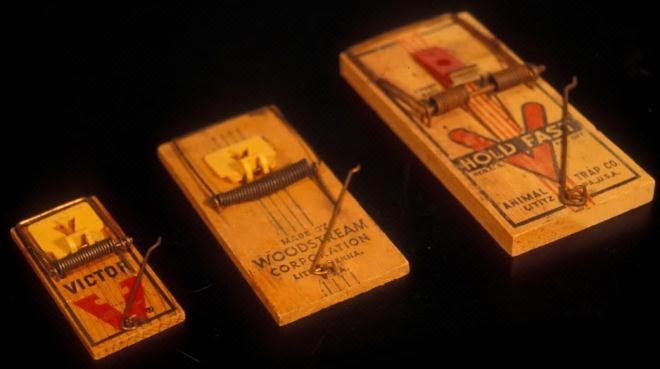
Mouse and Rat Snap Traps
The familiar mouse trap is a body-gripping trap (Figure 19). If the target is mice or rats, you will need several traps. Many options besides the traditional mouse snap trap are available.
Snap traps with expanded triggers (Figure 19) and the clothespin design (Figure 20) are much easier to set than the traditional mouse trap. The Quick Kill Mouse Trap® made by Victor® has a lid over the bait cup. Only animals that seek the bait will lift the lid, which is what triggers the trap. An animal can accidentally step on the lid without setting off the trap. The bait cup is located to position the mouse in the perfect strike position. This trap is more selective and more effective than traditional snap traps.
Multiple-capture Traps
Multiple-capture traps can catch more than one animal without having to be reset. Most multiple capture traps are designed for mice. Some brands, such as the Ketch-All®, will catch animals up to the size of a chipmunk, although larger animals are likely to suffer harm. Some designs (e.g., Ketch-All® and Kwick Katch®) have a wind-up spring that powers a rotating mechanism. Other traps (e.g., Victor Tin Cat®) have one-way doors that allow mice to enter but not leave. Check live traps often enough so that animals are not stressed or exposed to extreme temperatures.
Mole Traps
Mole traps are available in several designs (Figure 21). They are all set on, in, or underground at the tunnel. The key to successful trapping of moles is to identify active tunnels. Look for ridges, molehills, dead grass, and soft spots in the lawn. Prepare the site and set the trap according to the instructions given for the trap. If there is no activity after a few days, move the trap. If moles are active near the trap but you are not catching them, add more traps or switch to another type of trap.
Glue Boards
Glue boards have a layer of long-lasting adhesive spread over a surface, usually cardboard or plastic. Small animals stick in the adhesive. Although some consider glue boards a live trap, they often are not used that way. Animals can be removed from glue boards by applying oil to the adhesive, but the oil may harm the animal. In practice, animals frequently are left to die on glue boards. Glue boards are not recommended as a general-use tool. They may be needed to deal with some severe infestations of mice or rats. Snap traps often are more effective than glue boards and are more humane, although setting them does take more effort. If you use glue boards, check them frequently and humanely kill trapped animals. It is illegal to use glue boards for snakes.
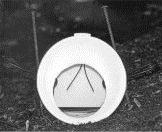
Bird Traps
Traps for birds are available in many designs (Figure 22). Some will capture one bird at a time, while others can capture many birds. Others capture specific species of birds. Remember to check federal regulations before trapping birds.
To increase your chance of success, habituate birds to the trap. First, put out some bird seed (shelled corn for pigeons) or other appropriate bait to habituate birds to feeding in the area.
When birds are regularly feeding at the site, place the cage trap next to the bait and prop it open with wires. Place bait outside and inside the trap to encourage the birds to enter the trap. If the birds do not come to the site, choose another area. Finally, when birds are accustomed to entering the trap, set the trap and place the bait only inside. Leave a captured bird inside the trap as a decoy. Give them shelter, water, and food daily.
Trapping Sets
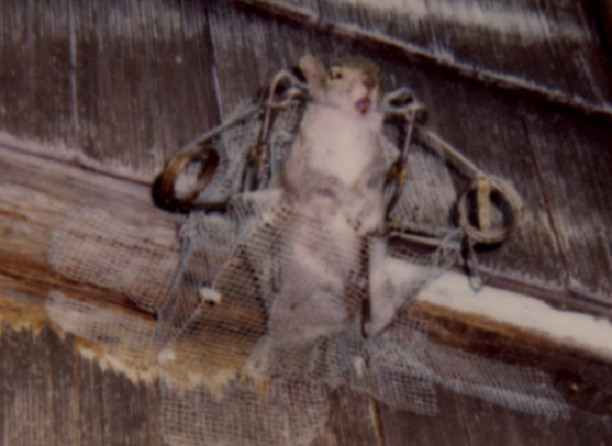
A set encompasses the use of the trap and its entire placement. Trapping sets can be described as either lethal or non-lethal. Footholds, and in some cases, cage traps can be situated in ways that allow the captured animal to die or live. Footholds, for example, can be attached to slide-wires that force the animal to enter deep water and drown.
Blind sets rely on the movement of the animal to trigger the trap. No bait is used. Blind sets can be used with foothold, cage, and box traps.
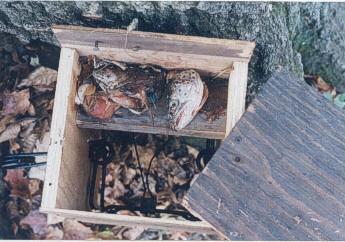
Positive sets place a trap directly over a den hole to force the animal into the trap (Figure 23).
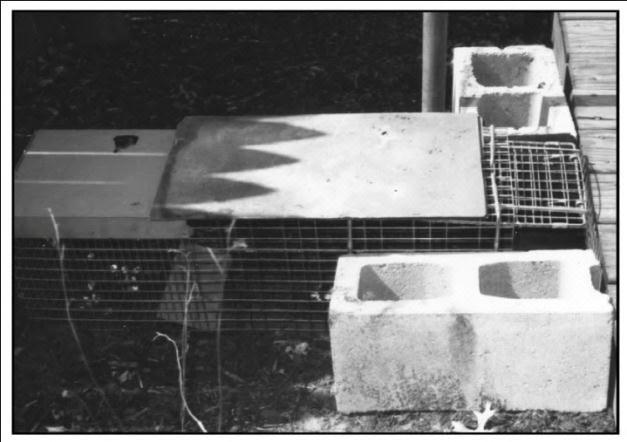
Cage traps with double doors can be positioned directly in front of a den hole and barricaded to direct the animal into the trap. Positive sets have an advantage in that you do not refresh bait. In addition, they substantially reduce the risk of capturing non-targets.
Baited sets are the most common. They rely on lure or bait to attract an animal to the trap. Use bait that selectively attracts the species. Marshmallows and sardines attract raccoons but marshmallows will not entice cats, so marshmallows are safer if you must trap where cats are free roaming. Cats are attracted to fat and protein-based baits, so choose sweet baits to reduce the likelihood of attracting cats. Mice are attracted by many types of bait that are appealing to other species but baits are not always necessary to attract mice. Instead, tie a cotton ball to the trigger. A cotton ball is an attractive bit of nest material to a mouse but is of no interest to many other species.
Trappers usually exploit an animal’s sense of smell. Place baits or lures in a trap so that the odors can disperse into the air. One method uses a “Y” stick. Scoop out some of the bait with the stem of the “Y.” Insert the stem into the bait area of the trap so that the forked ends grab onto the trap mesh and allow the stem to dangle. With this method, the bait has very high exposure to the air around it while keeping the bait off the ground and away from ants. This technique allows the bait to remain active even if it rains. The small surface area makes it difficult for rain to wash it away and when it does, the bait falls to the ground where it still may be effective.
An alternative is to use a T-shaped plastic (PVC) pipe with holes in it (Figure 24). They are long-lasting and will not be thrown off center when you cover the cage with a cloth.
To use the PVC bait stick with liquid bait, attach a termination cap to the end of the PVC pipe. The location of the first drilled hole will determine the amount of liquid bait held. Use pressure on the end cap to secure it instead of glue to allow the liquid bait to seep out slowly, permeating the area with attractant.
Trapper’s wire and cotton balls are useful for liquid-based baits and lures in cage traps because cotton absorbs the bait or lure. Skewer cotton balls with wire and bend the wire so they will not slide off.
Make a loop in the other end to hang the wire from the cage. As with any hanging method, ensure that the stick or wire will not move much in the wind. Failure to consider this may allow the animal to grab the bait without getting close enough to depress the treadle. Hang the bait stick or wire towards the back half of the bait area.
In situations where hanging bait is not possible or practical, use eye appeal. One NWCO uses Chef Boyardee® microwave lunch buckets. The small white plastic bowls have lids with holes. Bait is placed in the bowl and covered with the lid. The white bowl attracts the raccoon, the holes allow the smell to disperse through the air, and the lid helps protect the bait from being washed out in the rain. Yogurt containers with holes cut in the lids also work. Ensure that there is enough weight in the bottom of the containers so they aren’t blown over by the wind. Sight attractants are especially important for skunks or raccoons. Place marshmallows in the back of a trap to attract them in the dark.
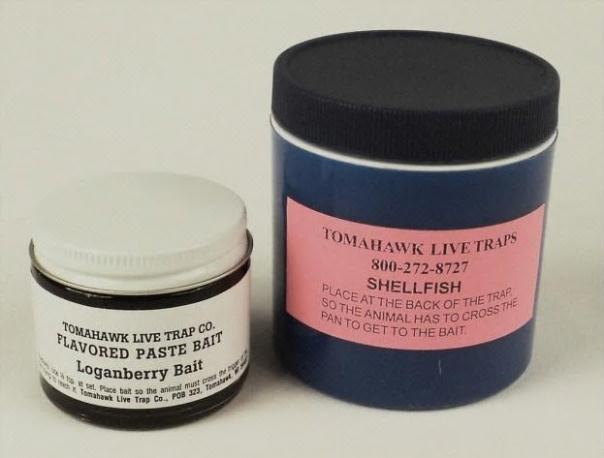
Lures and Baits
Lures are concentrated odors and may be detected by wildlife from great distances. Trailing lures are helpful when traps cannot be set in the ideal locations due to safety or theft concerns. Lures can help bring the target animal to your trap. Lures tend to be liquid and fall into 3 categories: food-based, gland-based, and curiosity.
Food-based lures trigger hunger and are scents that appeal to the animal’s appetite. They are extracts of fish oil, eggs, peanut butter, and other items. Gland-based lures trigger sexual or territorial behavior. Urine is a gland-based lure. Urine should be treated as a biohazard. Do not expose your face or hands to urine. Curiosity lures are odors that likely are unfamiliar to the animal, yet attractive enough to cause the animal to investigate.
Baits typically are food-based materials used to attract animals into traps. They come in chunks, pastes (Figure 25), and powders. They are subdivided into sugary baits called “sweet baits,” or oil and protein baits called “meat baits.”
Other Control Methods
Direct Capture
Some situations allow you to approach an animal, capture, and remove it in a single visit, without using a trap. Direct capture plays an important role in WDM. The proper equipment is important for safety of the NWCO and animal.
Gloves
We do not recommend grabbing wildlife using only gloves, except when dealing with juveniles.
Catch Pole
A catch pole (snare pole, Figure 26) is a versatile tool for the capture and restraint of animals. It is a long stick with a noose on one end.
For most species, place the loop over the head of the animal and tighten the cable. Bobcats may suffocate if the loop is only placed around their necks. Place the loop over the head and one front leg if possible. Minimize the amount of time an animal spends in a catch pole. Some catch poles swivel, allowing the animal to twist without being injured. Commercial catch poles often lock after the cable is pulled tight, and also have a quick release.
Other hand-operated devices, often called cat graspers, incorporate a vice-grip closure on the end of a pole (Figure 27). They can be useful if you are trying to capture small animals or if you are not able to get a loop around an animal. Poles with a vise-grip closure usually do not have the restraining power of catch poles.
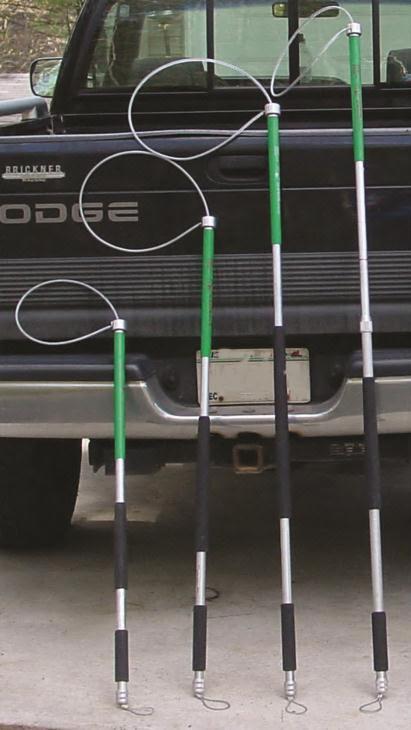
Photo by Tomahawk Live Trap Co.

Capture Nets
Capture nets, to be distinguished from nets used in exclusion, are available in varying designs such as throw nets, hoop nets, and mist nets. Throw nets are tossed over target animals. Hoop nets are attached to the end of a long handle and used to scoop up animals. The net should be deep enough to allow the hoop to be twisted to restrain the animal in the bottom of the net. A captured animal could climb out of a shallow net. The size of the mesh also is important. If the mesh is too large, the animal may force its head through and injure itself or strangle. If you must use a shallow net, immediately place the frame against a flat surface to prevent escape. You can further restrict the animal’s movement by carefully pressing on it with a stick. Encourage the animal to enter the net on its own, if possible. You may injure an animal while swinging a hoop net if you accidentally hit it with the frame.
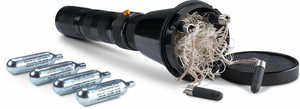
Mist nets are fine-threaded nets used to capture birds, such as sparrows and starlings inside warehouses. You will need training, skill, and federal and state permits to use mist nets to capture wild songbirds outdoors. Skill is needed to remove birds from the net without harming them. Mist nets should be monitored during use and removed immediately after use. Even veteran users can become frustrated trying to capture a sparrow or two in a net inside a large warehouse. CO2 powered net guns (Figure 28) are very effective for throwing light nets short distances.
One-way Doors
One-way doors (Figure 29) allow an animal to leave but not re-enter a building. They come in a variety of designs, sizes, and materials. For example, plastic check-valves or nets are used for bats. Wire frames are designed to work with certain species and fit certain cage traps. Some NWCOs build their own one-way doors. The advantage of one-way doors is that they do not require any handling of animals.
Before installing a one-way door, conduct a thorough inspection to make sure that all young are mobile. One-way doors only are effective if the animal can find and use the exit, but cannot find or force its way back through the door or find another way into the building. If a mother has been separated from her young and they are still inside, she will be highly motivated to find or create another entrance.
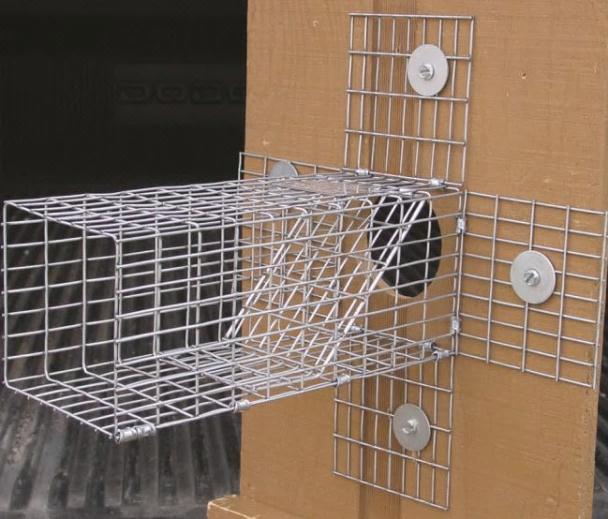
Photo by Tomahawk Live Trap Co.
Chemical Immobilization
Chemical immobilization means using a tranquilizer to sedate an animal using treated baits or remote injection equipment such as blowpipes or darts. Chemical agents immobilize animals so they are unable to escape a human who approaches. Products such as alpha-chlorolose, ketamine, and telazol typically are available only to state wildlife agency, USDA-APHIS-Wildlife Services (WS), veterinary, local animal control, and academic personnel. Purchase and use of these drugs requires federal and state licenses that are generally impractical or impossible for NWCOs to obtain.
Biological Control
Biological control typically involves the introduction of a predator to manage a target population. Predator control, although widely praised by the public, rarely works. For example, some people think that mice and voles can be controlled by placing perch poles around a field to encourage the presence of raptors. However, predators rarely reduce prey populations low enough to meet public expectations.
Fertility Control
Fertility or reproductive control can be considered a type of biological control. It is essentially birth control for wildlife. Most contraceptive methods require permits available only to researchers and veterinarians.
Some EPA-registered products, however, are available for feral pigeons and starlings that may stop them from laying viable eggs. For example, OvocontrolTM (active ingredient nicarbazin) is used to reduce the hatchability of pigeon eggs. These materials are not registered in all states and may require training, permits, or a pesticide applicator’s license. In some states, even food-grade corn oil is considered a pesticide when applied to eggs to reduce hatchability.
Eggs can be “addled” by oiling, puncturing, or shaking so that they will not hatch. Egg addling often is used to manage resident Canada geese in troublesome nesting areas. Permits from the USFWS are required (https://epermits.fws.gov/eRCGR/geSI.aspx). Landowners may designate a third party, such as a NWCO, but the permit must be in the landowner’s name and is time-specific. The USDA-APHIS-Wildlife Services (http://www.aphis.usda.gov/wps/portal/aphis/ourfocus/wildlifedamage ) administers the program, and also must submit an approval form. These rules are subject to change.